How to create users and assign them roles & applications
This article will take you through the process of creating users and assigning them to roles and applications.
Contents
Assigning users to applications
How to create users
We have several ways to generate users on our platform, you need to head over to the following page:
Settings (Cog) - Users (Sidebar)
The first thing you need to be familiar with is the rights available within our platform,
Role | Permissions |
Admin User | Full platform-wide rights with no restrictions |
Power User | This user has full access to all applications and server data and limited access to platform settings. |
Read and Report Only User (R&R) | This user has read-only access to all applications and server data. |
Power User Assigned (Power*) | This user has full access to all assigned applications and server data. |
Default User | This user has view-only access to assigned applications. |
Technical User | This user role can only see assigned application questions that have been categorised as "technical" and has no visibility of 7Rs recommendations or scoring. |
Business User | This user role can only see assigned application questions that have been categorised as "business" and has no visibility of 7Rs recommendations or scoring. |
Application User | This user role can only see assigned application questions that have been categorised as "application" and has no visibility of 7Rs recommendations or scoring. |
Internal User | This user role has access to questions and areas designated as Internal Only |
For most situations, Power User or Power User Assigned & Technical is the best option for users who will be completing application information and checking/amending server information.
Once you have understood the level of access, you can generate a user in several ways. these are as follows.

Create Single User - This generates a pop-up, where you fill out the user's details and their associated rights. This option will not send an invite to the user, their login details will need to be sent to them separately.
Import Users - This option enables you to upload a list of users into the account via the pop-up, using the import template provided. As above, this option will not send an invite, so login details will need to be sent to all users separately.
Bulk Assign Users - This is covered in more detail below, this option allows the bulk assignment of users to specific applications.
Invite Single User - This option allows the creation of a user account, which will then send an invite to join and choose a password for themselves. To use any of the "invite" features, valid email settings must be configured. See How to enable email integration
Bulk Invite Users - This option enables bulk creation and invites sent to multiple users as above using the CSV import template provided.
Invite Current User - This allows you to re-send an invite to an existing user if the previous link has expired or to allow the user to reset their password.
Assigning users to applications
Once user accounts have been created on the platform, you can assign these users to specific applications. This allows you greater control of what your users see and don't see on the platform.
To add a user to a single application navigate to the application.
Portfolio (Tab) - Applications (Drop Down) - Selected Application - Assigned Users (Sidebar)
Click the "Assign User" button. Select the required users and click 'Assign Selected'.

You can do this for multiple users for multiple applications from the user's screen located in the settings, via the 'Bulk Invite Users' option.
Settings (Cog) - Users (Sidebar) - Bulk Assign Users (Button)

Deleting users
In the event you want to delete users you first need to head to:
Settings (Cog) - Users (Sidebar)
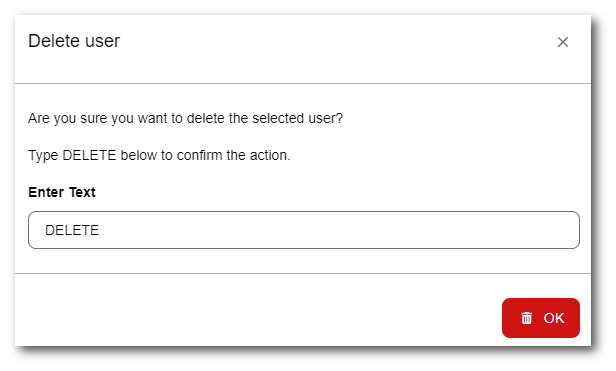
You then need to tick the ones you wish to remove, and select 'Delete', this will generate a pop-up. This will then prompt you to type DELETE in caps and select the 'OK' button. Once completed the servers will be removed.

To contact Cloud Navigator sales or support for any reason at all, simply email cloudnavigator-support.gb@softwareone.com and one of the team will get back to you. If your issue is urgent, please mark the email as URGENT in the subject line.
