Reviewing planning settings
This article will deep dive into the planning settings that impact your transformation schedule values.
Contents
Understanding planning settings tables
Understanding planning settings tables
You first need to locate the planning settings page, this can be found here:
Activities (Tab) - Planning & Transformation (Drop Down) - Planning Settings (Sidebar)
On this page, you will see a series of tables. We will break down what each of these tables means. All the values are user inputted and you may also have something running this internally already. It's worth noting the difference between Effort and Duration. Duration is the length of the application's migration in actual time, the effort is the number of person-days that will be burned during the migration, and the migration's actual working time.
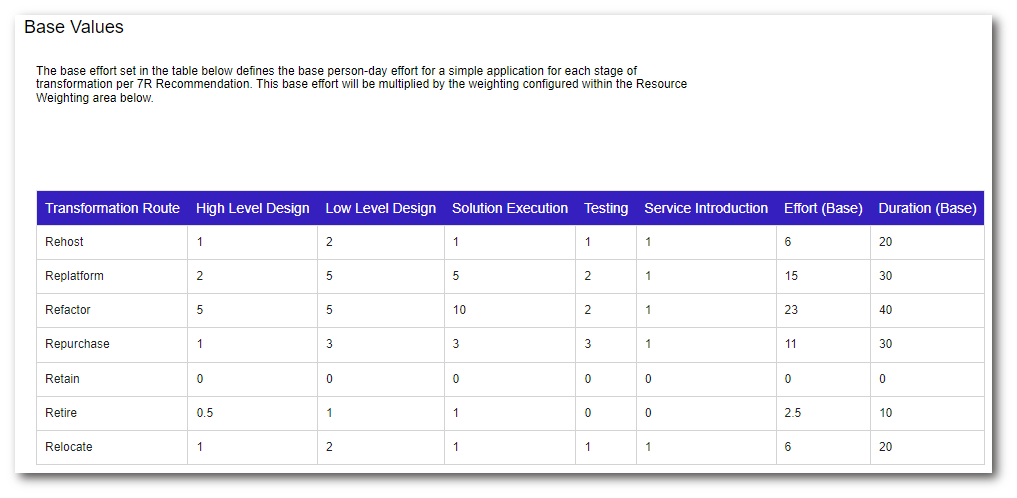
Base Values - In this table, the base values for person-days of work for completing each task via each of the different recommended routes are entered. We also have the capability to input the duration we expect for this to be completed. This is a base value for a low-risk, low-complexity application for each of the 7R options.
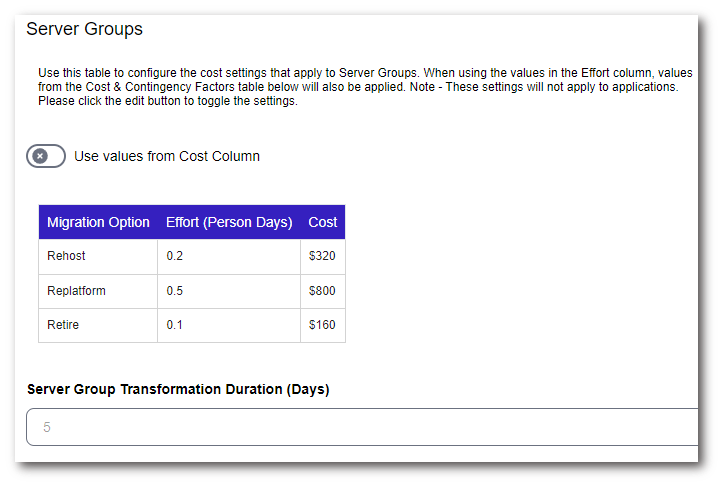
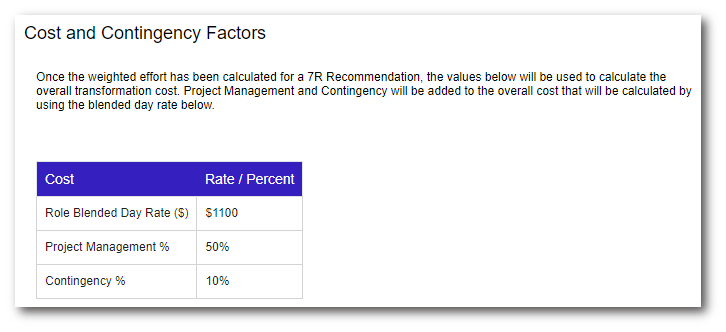
Server Groups - This table applies only to server groups that are put into the plan and NOT TO applications. The system will use the settings in this table to apply to all the servers in a server group, which are then summed to give the final transformation cost estimates for a server group. By default the system will use the effort column to apply a cost to a server's transformation activity, this is based on the figures in the "Cost and Contingency Factors" table, which also includes the PM and Contingency details set here.
Another method to estimate a transformation cost for a server group is by turning on the toggle to use manual costs. This simply applies the cost set in the table to the server based on its R route in the server's transformation activity. This method will not add the PM and contingency costs.
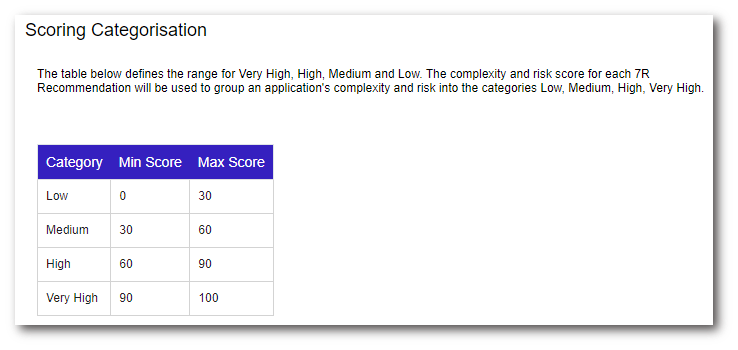
Scoring Categorisation - This table allows us to apply categorisation to applications that meet specific scoring levels for Risk and Complexity. So in the screenshot below we can see anything with a Risk or Complexity score of 35, would be categorised as Medium:
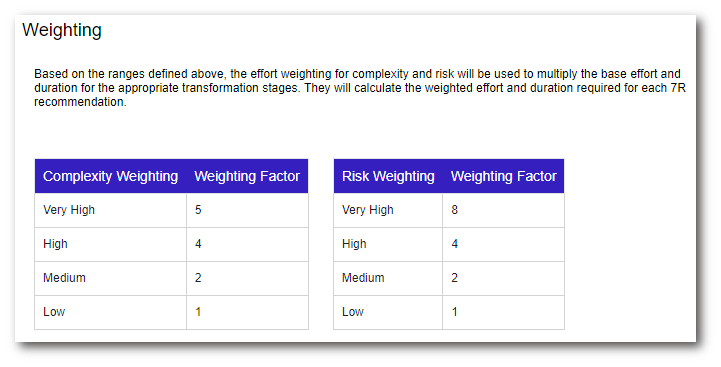
Weighting - This table works in conjunction with the previous two tables, to apply a multiplier to categorisations. So in the example above, if an application falls into the Medium category it would be x2 of its base effort. To allow more granularity and control of the cost estimates, complexity weightings apply to the activities from the base values table in blue, while risk weighting is applied to the activities in pink.
Cost And Contingency Factors - In this table, you insert the blended day rate that will be used multiplied by the number of person-days to calculate the transformation cost for the application. You can also enter an additional cost for Project Management and Contingency, this is entered as a percentage and will get added on to the person-day cost to give a total transformation cost for the application.
Future Run Costs - This table allows you to set an estimated Future run cost as a % against a Rehost for all other 7R options.
Overwriting values
We understand the tables above generate an estimate of Effort, Duration and Costs. We know in some cases this may need to be amended for specific applications that are moving to the cloud. This can be done here:
Activities (Tab) - Planning & Transformation (Drop Down) - Transformation Schedule (Sidebar)
First, locate the move group of the application and open this move group up. Next, click the application you want to overwrite values on. This then presents the application modal:
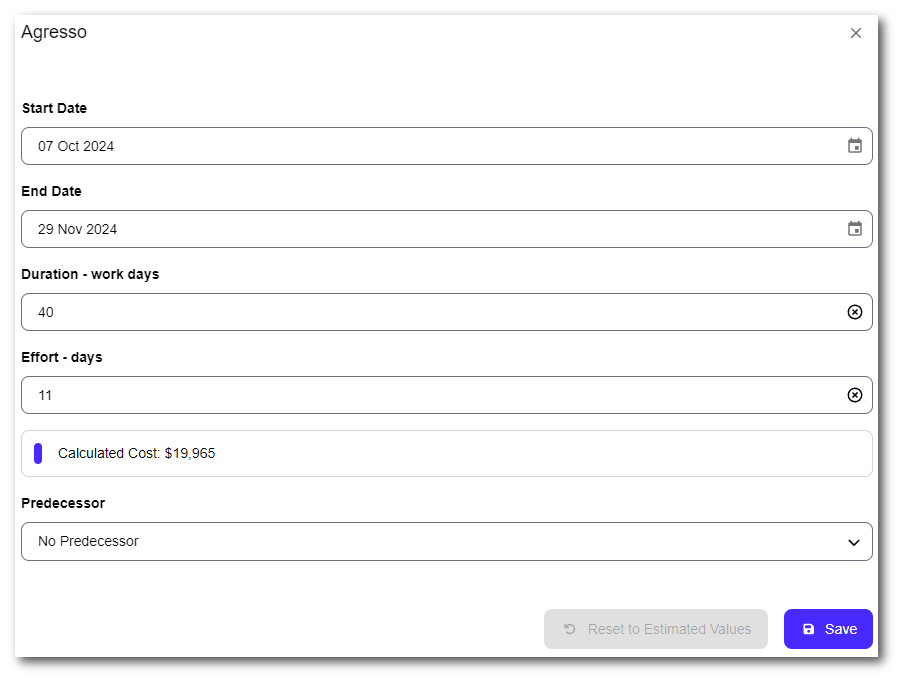
On this page, you can then overwrite the Start Date, Effort and Duration values. Updating the effort will also update the cost.
Once saved this updates the transformation schedule and now adds an icon next to the altered value, indicating its original estimate, this is in the event you want to compare the two values. Customized values can be reset at any time by clicking the "Reset to Estimated Values" button on the application pop-up.
Applications have to be added to a Move Group to appear in the Transformation schedule.
To contact Cloud Navigator sales or support for any reason at all, simply email cloudnavigator-support.gb@softwareone.com and one of the team will get back to you. If your issue is urgent, please mark the email as URGENT in the subject line.
